


Friday, March 31, 2023
Strawberry Jam and Good Memories
A gift of Florida strawberries prompted me to turn some of them into jam. The smell of sugar and berries, and the sound of jar lids popping this morning made me remember doing those things with my Mother, and the hot summer Memphis days in the kitchen when we canned fruits and vegetables from her garden. I hope my kids and grandchildren have the same kinds of happy thoughts about the things we do together. If you haven’t made a memory today, or pulled one out that makes you smile, maybe sharing this will help you to do that. Celebrating today with strawberry jam and good memories! I used the recipe from the Certo liquid fruit pectin package and 8 cups of sliced berries for 8 half pint jars of jelly and a little left over. I used my favorite recipe for homemade bread, Amish White Bread. It makes 2 9x5 inch loaves of bread. I use 1 cup of whole wheat flour instead of all white bread flour. It makes a loaf that is easy to slice and holds up well enough to use for a sandwich. It's also the perfect way to enjoy fresh strawberry jam.

Thursday, April 2, 2020
Simple sewing! Cloth Napkins tutorial
I have always thought that I would like to teach sewing. Maybe this is my first class!
I haven't used cloth napkins regularly since I left home in 1974. My Mother used them all the time and made lots of them. My first experience in learning to iron was as a little girl, and I was allowed to iron the napkins and handkerchiefs.
The shortage of many supplies during the coronavirus quarantine inspired me to conserve the paper napkins and paper towels I have on hand, and make some cloth ones to reuse instead. I am going to heartily recommend a video tutorial that was my reference. It is well done and she has already worked out all the handy techniques. I'll go over the steps I followed, and you can also watch the expanded version. Here's the video that got me considering cloth napkin production.
Supplies You will need:
a square of fabric, (at least 12 inches square, bigger is better) You may want to practice the technique on something smaller at first.
scissors (cutting mat and rotary cutter are nice but optional)
ruler
iron
starch is helpful, see below
thread to match
a working sewing machine, with an edge stitching foot if you have one.
1 yard of 54 inch fabric, or 1 1/2 yard of 45 inch fabric will make 6 napkins. Quilting cotton is fine.
I started with 1 yard of 54 inch home dec fabric. I didn't pre wash. I felt the hems would press in better without prewashing. I also used spray starch. My favorite is Sta Flo in the blue jug from Walmart or Fred Meyer, diluted about 1/3 starch to 2/3 water in a spray bottle.
Here's a finished napkin.
 I cut my 1 yard of fabric into 18 inch squares. I did a little math for the piece of fabric I had on hand and that size made 6 napkins. The video calls for 20 inch squares. I thought that sounded huge, and I could get 6 from my fabric if I made them smaller. I also skipped the little loops and buttons she shows in the video. They're cute but not necessary. I used starch and ironed the hems in the squares, starting at the top edge and working counter clockwise. My hems were 1/2 inch instead of the suggested 5/8. I folded over once, ironed, folded that hem down and ironed.
I went back and took some more pictures of the corner fold with a different fabric.
I cut my 1 yard of fabric into 18 inch squares. I did a little math for the piece of fabric I had on hand and that size made 6 napkins. The video calls for 20 inch squares. I thought that sounded huge, and I could get 6 from my fabric if I made them smaller. I also skipped the little loops and buttons she shows in the video. They're cute but not necessary. I used starch and ironed the hems in the squares, starting at the top edge and working counter clockwise. My hems were 1/2 inch instead of the suggested 5/8. I folded over once, ironed, folded that hem down and ironed.
I went back and took some more pictures of the corner fold with a different fabric.

 Turn to the next side, and repeat, folding over the ends at the corners and pressing.

 Keep moving around the whole square. Repeat for all the napkins.
Sewing
I used an edge stitching foot and did not pin anything. Start in the middle of one side, with the folded hem facing up. That means the bobbin thread will show on the front side of the napkin, so make sure your tension is correct and the stitches look nice. Practice on a scrap if you need to first. I lengthened my stitch a little, and used contrasting thread that showed up against the fabric on top and in the bobbin. If you're not confident of your stitching, use a neutral thread that won't show as much. Sew along the edge of the hem, and stop stitching about 6 inches before you get to the bottom edge. You need to leave yourself space to fold in the mitered corner. If you stitch too far, you will not have room to work.

 Stop stitching, leave the presser foot down and the needle in and unfold the hem on the right hand side. Leave the bottom hem folded up twice.
It will help to watch the video for this step. Fold the right hem up in a triangle, lining it up with the inside crease from the folded hem. Make sure the triangle fold goes all the way to the raw edge on the right. Tuck in the first fold with the mitered corner and then re-fold the second fold. You should be pretty close to having a mitered corner that meets at the hem edges. Wiggle things around a little if it seems way off. Again, watch the video for a better visual of this step. If it helps, make the folds and put a pin in to hold them ahead of time and remove the pins as you get to the corners.
Stop stitching, leave the presser foot down and the needle in and unfold the hem on the right hand side. Leave the bottom hem folded up twice.
It will help to watch the video for this step. Fold the right hem up in a triangle, lining it up with the inside crease from the folded hem. Make sure the triangle fold goes all the way to the raw edge on the right. Tuck in the first fold with the mitered corner and then re-fold the second fold. You should be pretty close to having a mitered corner that meets at the hem edges. Wiggle things around a little if it seems way off. Again, watch the video for a better visual of this step. If it helps, make the folds and put a pin in to hold them ahead of time and remove the pins as you get to the corners.


 I stitched just over the first fold of the miter, leave the needle down, lift the presser foot and turn the napkin to start stitching the next side.
 Stitch around all 4 sides and repeat for all the napkins. You will get better as you practice!
Clip loose threads, make sure the front sides look nice.
I ran them through the wash when I finished. They're napkins, they are going to be washed and probably get stained. If they're not quite square or the hems are not exactly even, it doesn't matter. You did something pretty and creative for yourself and your family!
I think the size is just right, and 20 inch squares would also have been a great size. By the time you add the hems and then they shrink a little when they are washed, a little bigger is better. The 18 inch made the most of my fabric size.
Stitch around all 4 sides and repeat for all the napkins. You will get better as you practice!
Clip loose threads, make sure the front sides look nice.
I ran them through the wash when I finished. They're napkins, they are going to be washed and probably get stained. If they're not quite square or the hems are not exactly even, it doesn't matter. You did something pretty and creative for yourself and your family!
I think the size is just right, and 20 inch squares would also have been a great size. By the time you add the hems and then they shrink a little when they are washed, a little bigger is better. The 18 inch made the most of my fabric size.

 Here's a regular paper napkin on top of my cloth one for size reference.

 I hope this encourages you to try making some cloth napkins.
This blogging adventure is not something I have experience in, but what better time to play with technology? If you have questions or need help with any sewing subject, or this project, I will try to answer. I would love to see pictures of your napkins!
Love, and best stitches!
Kathy
I hope this encourages you to try making some cloth napkins.
This blogging adventure is not something I have experience in, but what better time to play with technology? If you have questions or need help with any sewing subject, or this project, I will try to answer. I would love to see pictures of your napkins!
Love, and best stitches!
Kathy
I haven't used cloth napkins regularly since I left home in 1974. My Mother used them all the time and made lots of them. My first experience in learning to iron was as a little girl, and I was allowed to iron the napkins and handkerchiefs.
The shortage of many supplies during the coronavirus quarantine inspired me to conserve the paper napkins and paper towels I have on hand, and make some cloth ones to reuse instead. I am going to heartily recommend a video tutorial that was my reference. It is well done and she has already worked out all the handy techniques. I'll go over the steps I followed, and you can also watch the expanded version. Here's the video that got me considering cloth napkin production.
Supplies You will need:
a square of fabric, (at least 12 inches square, bigger is better) You may want to practice the technique on something smaller at first.
scissors (cutting mat and rotary cutter are nice but optional)
ruler
iron
starch is helpful, see below
thread to match
a working sewing machine, with an edge stitching foot if you have one.
1 yard of 54 inch fabric, or 1 1/2 yard of 45 inch fabric will make 6 napkins. Quilting cotton is fine.
I started with 1 yard of 54 inch home dec fabric. I didn't pre wash. I felt the hems would press in better without prewashing. I also used spray starch. My favorite is Sta Flo in the blue jug from Walmart or Fred Meyer, diluted about 1/3 starch to 2/3 water in a spray bottle.
Here's a finished napkin.


Sewing
I used an edge stitching foot and did not pin anything. Start in the middle of one side, with the folded hem facing up. That means the bobbin thread will show on the front side of the napkin, so make sure your tension is correct and the stitches look nice. Practice on a scrap if you need to first. I lengthened my stitch a little, and used contrasting thread that showed up against the fabric on top and in the bobbin. If you're not confident of your stitching, use a neutral thread that won't show as much. Sew along the edge of the hem, and stop stitching about 6 inches before you get to the bottom edge. You need to leave yourself space to fold in the mitered corner. If you stitch too far, you will not have room to work.


Saturday, May 28, 2016
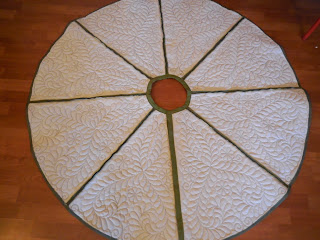
Tree Skirts
I made one to donate for a gift card tree for a fundraiser at work. I have 6 more to make, and keep taking orders for another one every time someone sees it.
Here is how I put them together
Stitched out the designs from One Song Needlearts onto taffeta with polyester batting and muslin backing.
Cut out designs and serged around all the inside edges. Started at a bottom corner, up one straight side, across the curved center, down a straight side. I did not serge the bottom curve yet.
Sewed sections together in 2's, matching the stitching lines at the top, bottom and center with a pin. Used 1/2" seam allowance, about the width of the edge stitching on the design.
Sewed 2 sections of 4 together and then pressed all seams open on the back.
Serged around the entire outside edge.
Made bias binding or used purchased wide double fold bias in a matching color.
Stitched bias binding at the 1/2 inch line to both remaining straight edges.
Folded 1 of the straight edges under and topstitched.
Stitched bias binding around the inside center circle, turning the edges under at the beginning and the end.
Stitched 1 inch pieces of Velcro to the underside of the topstitched edge and the top of the bias binding edge, in matching places at 4 spots.
Pressed under the hem at the edge of the stitching line, about 1/2" hem and topstitched at 1/4".
Now, to stitch out and finish 6 more.
 One of the design options, finished at the Sewing Retreat
 Feather design, shown on the longarm
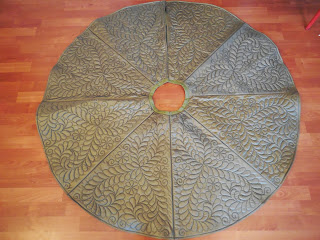 Finished tree skirt
 Back side
 Velcro closure, sewn onto bias binding along one seam
 Serged edges
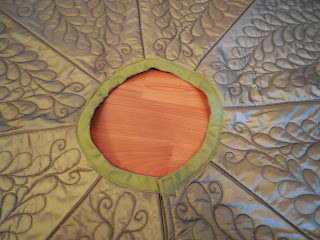 bias binding in center
Monday, December 21, 2015
Quick Gingerbread houses made with graham crackers
This summary is not available. Please
click here to view the post.
Tuesday, November 5, 2013
Sewing Guild retreat and some patterns that fit!
I went to the fall retreat for my Sewing Guild, determined to create some patterns I could use for garments for me. I have a shelf full of lovely fabrics, but needed help with fitting and I got it from my sewing sisters. I left with 3 skirts, 2 tops, a vest I made from a jacket pattern, and a sheath dress that fits. Wahoo! Thanks are due to Carolyn from Diary of a Sewing Fanatic, and Debbie, from Stitches and Seams, for posting their trials and errors and their successes and inspiring me to get back to making my own clothes.
Straight skirt from beautiful piece of donated plaid fabric, McCalls 2120
 6 gore skirt McCalls 4937 with knit top Simplicity 4076. Top could be a little less snug. I need to hem the skirt a little shorter, just below my knee.
 Magic Pencil Skirt by Pamela's Patterns, will be a fast and easy one for travel especially. Knit top Simplicity 2148. Collar band is floppy and I'm not sure I love the cut-on sleeve.
 Vest made of donated home dec fabric, test for jacket pattern Butterick 4818, needs button or a frog closure was suggested by my sewing sisters. Fit is much nicer than showing in this picture! And it looks like a nice brocade, and not like a sofa, which was a nice surprise.

Straight skirt from beautiful piece of donated plaid fabric, McCalls 2120


Test muslin of dress pattern Butterick 5147, needs sleeves and hemming at a better length.

Friday, June 14, 2013
Friday, June 29, 2012
I love this quilt, and the instructions look do-able.
http://weddingdressblue.wordpress.com/2012/03/23/tutorial-fading-charms-quilt/
http://weddingdressblue.wordpress.com/2012/03/23/tutorial-fading-charms-quilt/
Tuesday, June 26, 2012
I never got this far doing freemotion on my machine, but this is inspiring~
http://www.sewcalgal.blogspot.com/2012/02/february-2012-fmq-challenge-tutorial.html
http://www.sewcalgal.blogspot.com/2012/02/february-2012-fmq-challenge-tutorial.html
Saturday, January 28, 2012
Tuesday, November 1, 2011
Embroidered quilt for Mary
 These are pictures of a quilt top my Mother embroidered by hand at least 15 years ago. I quilted it for Mary's
24th birthday. Block designs by One Song, border is Abundant feathers by Three Sisters. Hobbs 80/20
 batting underneath, Dream wool on top.


Subscribe to:
Posts (Atom)


